Configuring Azure Active Directory login with Umbraco Members

This post is about configuring Azure Active Directory with Umbraco Members (not Users), meaning this is for your front-end website, not the Umbraco back office. I did write up a post about Azure AD with back office users though, so if that is what you are looking for then this is the link.
Install the Nuget packages
First thing to do is get the UmbracoIdentity package installed.
(This will also install the UmbracoIdentity.Core base package)
This package installs some code snippets and updates your web.config to enable ASP.Net Identity for Umbraco members. Umbraco ships with the old and deprecated ASP.Net Membership Providers for members and not ASP.Net Identity so this package extends the Umbraco CMS and the Umbraco members implementation to use ASP.Net Identity APIs to interact with the built in members data store. Installing this package will remove the (deprecated) FormsAuthentication module from your web.config and it will no longer be used to authenticate members, so the typical members snippets built into Umbraco macros will not work. Instead use the supplied snippets shipped with this package.
To read more about this package see the GitHub repo here.
Next, the OpenIdConnect package needs to be installed
Configure Azure Active Directory
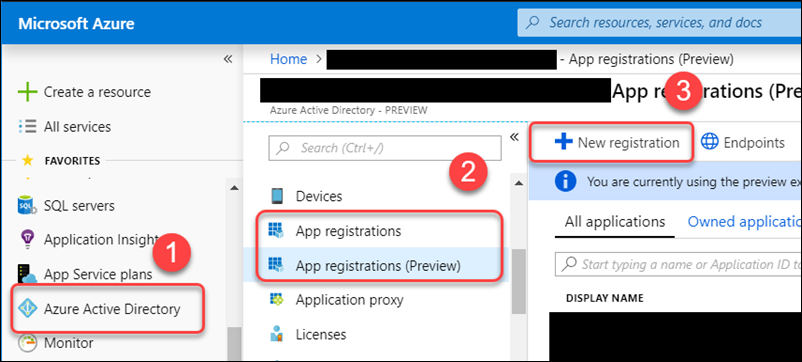
Head over to the Azure Active Directory section on the Azure portal, choose App Registrations (I’m using the Preview functionality for this) and create a New registration
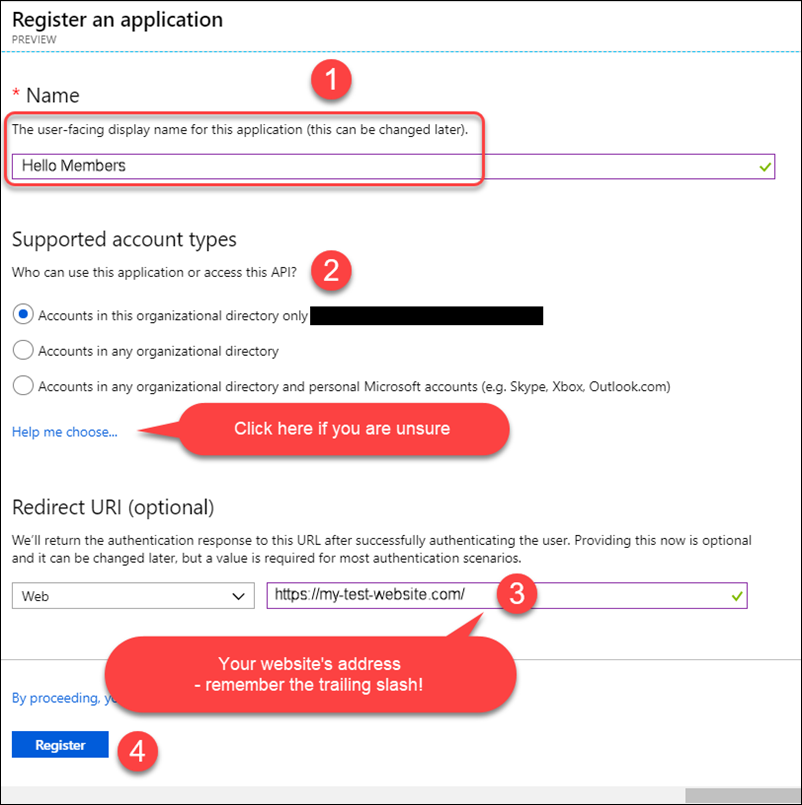
Next fill out the app details
You may also need to enter other redirect URLs depending on how many different environments you have. All of these URLs can be added in the Authentication section of your app in the Azure portal.
For AAD configuration for front-end members, the redirect Urls are just your website’s root URL and it is advised to keep the trailing slash.
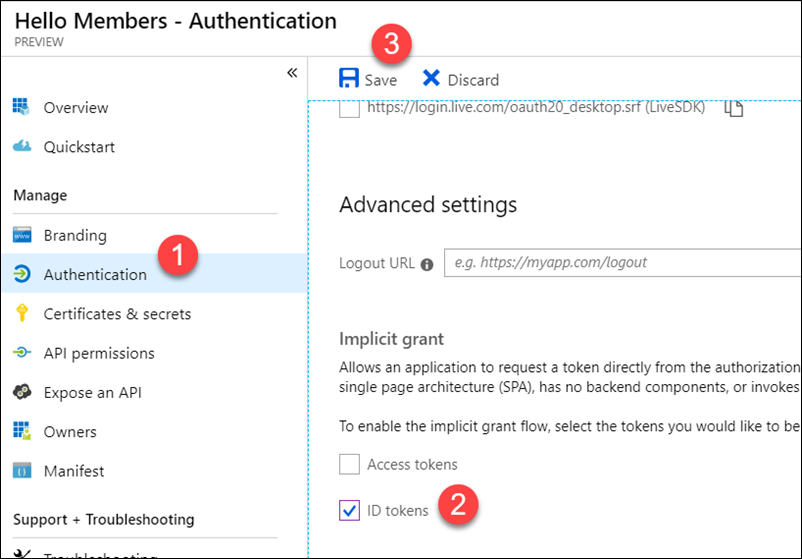
Next you will need to enable Id Tokens
Configure OpenIdConnect
The UmbracoIdentity package will have installed an OWIN startup class in ~/App_Start/UmbracoIdentityStartup.cs (or it could be in App_Code if you are using a website project). This is how ASP.Net Identity is configured for front-end members and where you can specify the configuration for different OAuth providers. There’s a few things you’ll need to do:
Allow external sign in cookies
If you scroll down to the ConfigureMiddleware method, there will be a link of code to uncomment: app.UseExternalSignInCookie(DefaultAuthenticationTypes.ExternalCookie); this is required for any OAuth providers to work.
Enable OpenIdConnect OAuth for AAD
You’ll need to add this extension method class to your code which is some boiler plate code to configure OpenIdConnect with AAD:
public static class UmbracoADAuthExtensions
{
    public static void ConfigureAzureActiveDirectoryAuth(this IAppBuilder app,
        string tenant, string clientId, string postLoginRedirectUri, Guid issuerId,
        string caption = "Active Directory")
    {
        var authority = string.Format(
            System.Globalization.CultureInfo.InvariantCulture,
            "https://login.windows.net/{0}",
            tenant);

        var adOptions = new OpenIdConnectAuthenticationOptions
        {
            ClientId = clientId,
            Authority = authority,
            RedirectUri = postLoginRedirectUri
        };

        adOptions.Caption = caption;
        //Need to set the auth type as the issuer path
        adOptions.AuthenticationType = string.Format(
            System.Globalization.CultureInfo.InvariantCulture,
            "https://sts.windows.net/{0}/",
            issuerId);
        app.UseOpenIdConnectAuthentication(adOptions);
    }
}
Next you’ll need to call this code, add the following line underneath the app.UseExternalSignInCookie method call:
app.ConfigureAzureActiveDirectoryAuth(
    ConfigurationManager.AppSettings["azureAd:tenantId"],
    ConfigurationManager.AppSettings["azureAd:clientId"],
    //The value of this will need to change depending on your current environment
    postLoginRedirectUri: ConfigurationManager.AppSettings["azureAd:redirectUrl"],
    //This is the same as the TenantId
    issuerId: new Guid(ConfigurationManager.AppSettings["azureAd:tenantId"]));
Then you’ll need to add a few appSettings to your web.config (based on your AAD info):
<add key="azureAd:tenantId" value="YOUR-TENANT-ID-GUID" />
<add key="azureAd:clientId" value="YOUR-CLIENT-ID-GUID" />
<add key="azureAd:redirectUrl" value="http://my-test-website/" />
Configure your Umbraco data
The UmbracoIdentity repository has the installation documentation and you must follow these 2 instructions, and they are very simple:
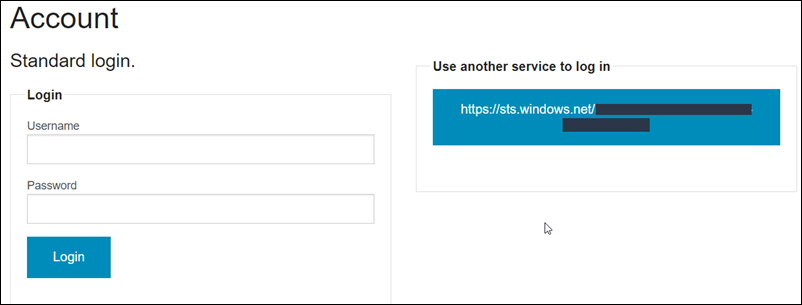
Once that is done you will have an Member account management page which is based off of the installed views and snippets of the UmbracoIdentity package. This account page will look like this:
As you can see the button text under the “Use another service to log in” is the login provider name which is a bit ugly. The good news is that this is easy to change since this is just a partial view that was installed with the UmbracoIdentity package. You can edit the file: ~/Views/UmbracoIdentityAccount/ExternalLoginsList.cshtml, the code to render that button text is using @p.Authentication provider but we can easily change this to @p.Caption which is actually the same caption text used in the extension method we created. So the whole button code can look like this instead:
<button type="submit" class="btn btn-default"
        id="@p.AuthenticationType"
        name="provider"
        value="@p.AuthenticationType"
        title="Log in using your @p.Caption account">
    @p.Caption
</button>
This is a bit nicer, now the button looks like:
The purpose of all of these snippets and views installed with UmbracoIdentity is for you to customize how the whole flow looks and works so you’ll most likely end up customizing a number of views found in this folder to suit your needs.
That’s it!
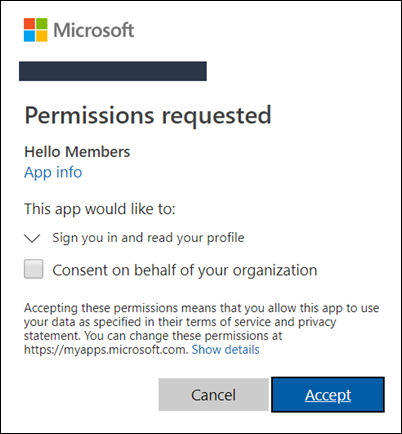
Once that’s all configured, if you click on the Active Directory button to log in as a member, you’ll be brought to the standard AAD permission screen:
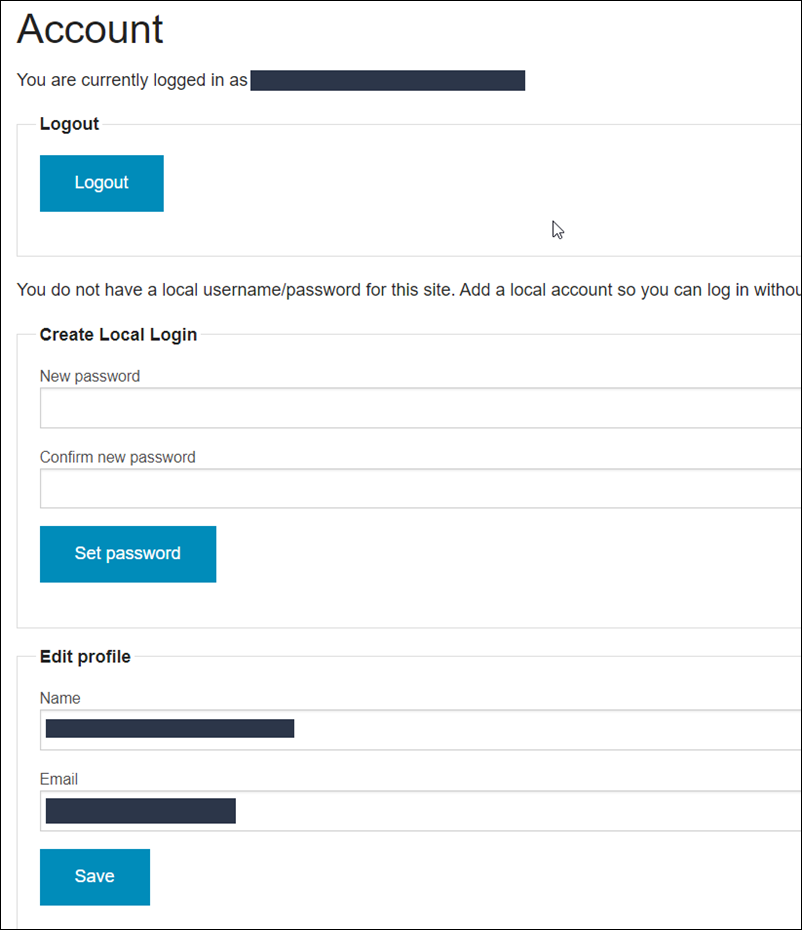
Once you accept you’ll be redirect back to your Account page:
Any customizations is then up to you. You can modify how the flow works, whether or not you accepting auto-linking accounts (like in the above example), or if you require a member to exist locally before being able to link an OAuth account, etc… All of the views and controller code in UmbracoIdentity is there for you to manipulate. The main files are:
- ~/Views/Account.cshtml
- ~/Views/UmbracoIdentityAccount/*
- ~/Controllers/UmbracoIdentityAccountController.cs
- ~/App_Start/UmbracoIdentityStartup.cs
Happy coding!
