How I configure my Umbraco Cloud website to support Nuget packages

Disclaimer: This post is about how I have my own website setup. This is based on my own personal opinions and is not meant to be an Umbraco Cloud ‘best practices’ guide. I’ve written this post since it might help others who have the same requirements as I do.
My Requirements
For my simple website, I would like to manage all of my dependencies with Nuget, I don’t need anything compiled, don’t need class libraries and I don’t mind putting any required custom code into App_Code.
Umbraco Cloud provisions a deployment Git repository which for all intensive purposes is meant for deploying code between environments, not so much for a source code repository. That said, since my website is ultra simple and doesn’t contain any class library projects (etc…) I figured having an ASP.Net website project configured in the Umbraco Cloud repository would be fine. A website project is different from the standard web application project; a website doesn’t compile, it runs as-is which is suitable for the Umbraco Cloud Git repository since that’s exactly what the repository is made for: to host a deployed website that runs based on the files as-is. I prefer working with web application projects normally but in this case my website is ultra simple and a website project will work just fine plus this allows me to have a Visual Studio project/solution that works fairly seamlessly with Umbraco Cloud.
How to set this up
There’s not a lot required to set this up but there are a couple ‘gotchas’, here’s the steps:
1) Clone your Umbraco Cloud Git repo
The first step is straight forward, you need to clone your Umbraco Cloud Git repository to your local machine
2) Open your Umbraco Cloud site as a Website in Visual Studio
Open Visual Studio, File –> Open –> Web site and choose the folder where your Umbraco Cloud site is cloned. This will open your Umbraco Cloud folder as a website project (at this point you could ctrl+F5 and it would run your site).
3) Save the sln file
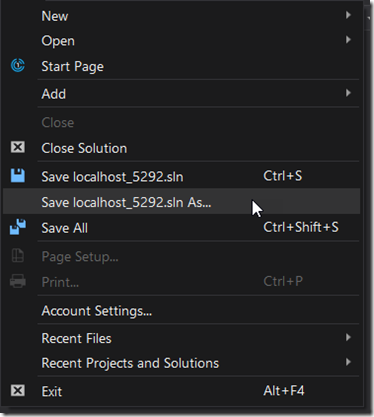
You need to save the Visual Studio .sln file in order to have Nuget references, File –> Save localhost_1234.sln As…
This menu option is a bit odd and that’s because Visual Studio has created an in-memory .sln file which it’s auto-named to be localhost_PORT.sln
When you click on that, browse to your Umbraco Cloud Git repo folder and name the file something that makes more sense than localhost_PORT.sln.
4) Configure the Solution and Project to not build the website
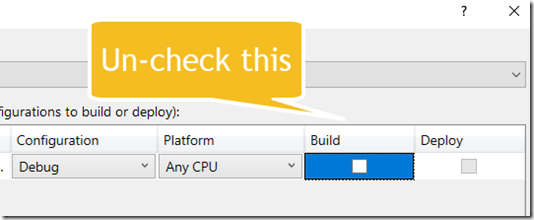
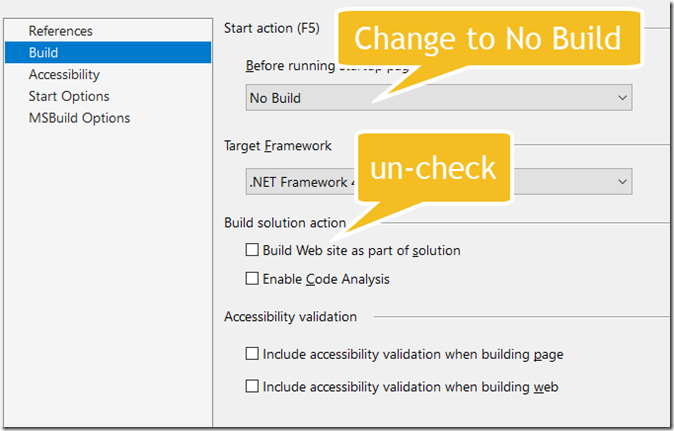
This is optional but by default Visual Studio will try to build your website which means it’s going to try to precompile all views, etc… which not only can take some time but you will get false positive errors. So instead there’s 2 things to do: In Configuration Manager turn off the “Build” option for the website project and in the website project settings turn off building. Here’s how:
Build –> Configuration Manager opens a dialog, uncheck the Build checkbox for the website
Then right click the root of your website project and choose “Property Pages” and click on the “Build” navigation element. Then change the “Start action” to “No build” and un-check the “Build website as part of solution” checkbox
5) Create a Kudu .deployment file
Here’s one of the ‘gotchas’. Like Azure web apps, Umbraco Cloud also uses Kudu to perform some of it’s operations such as deploying a website from the Git repository to the hosting directory on the server. By default Kudu will copy the files in the deployment repository as-is to the hosting directory on the server (which is what we want)… that is until Kudu sees things like .sln or .csproj files in the root of the Git repository, then it tries to be clever and build things (which we don’t want).
So to tell Kudu to just deploy the files as-is, we create a special Kudu file at the repository root called .deployment (to be clear this file name starts with a dot!).
To create this, in your Visual Studio website project, right click the root click Add –> Add new item –> Choose Text File –> Enter the name .deployment
Then add the following to this file:
[config]
project = .
and this tells Kudu to just deploy the files that are found in the repo.
6) Now you can add Nuget references
Once all of this is setup, you can add Nuget references to this website project like you would normally add Nuget references. At this point you might need to make a choice: Do you want to manage your Umbraco installation based on Nuget? In some cases you might not have a choice if you need to reference a Nuget package that has a dependency on Umbraco.Core.
As it turns out this choice isn’t such a big deal but some things to be aware of. Since Umbraco Cloud auto-upgrades projects to the latest patch version, you might be concerned that your packages.config is going to get out of date… luckily Umbraco Cloud is clever and will auto-update this file to the version it just upgraded you too. This also goes for minor version upgrades that you perform on Umbraco Cloud. Since Umbraco Cloud auto-commits all of the upgraded files, it means you really don’t have to do anything.
7) You’ll need to commit the special *.dll.refresh files
Once you start using Nuget with a website project, you’ll notice a bunch of these *.dll.refresh files in your /bin directory. You’ll need to commit those. These are special marker files used by Visual Studio to know how to manage Nuget dependencies with a website project.
That's it!
The above setup is an easy way to setup a Visual Studio solution with a single website project that works seamlessly with Umbraco Cloud while allowing you to manage dependencies with Nuget.
But what if your solution is more complicated or you want to add class libraries, etc… ? There’s Umbraco documentation on how to configure this found here: https://our.umbraco.com/documentation/Umbraco-Cloud/Set-Up/Visual-Studio/, https://our.umbraco.com/documentation/Umbraco-Cloud/Set-Up/Working-With-Visual-Studio/ and the configuration there isn’t so different than the above except that the .sln file isn’t committed to the Umbraco Cloud Git deployment repository and instead exists in your own Git repository which in that case, the special .deployment file is not necessary.


